Pages

~ Bee Design On Dining Room Chairs

Rabu, 28 Oktober 2009

I promised to come back and show how the bee design was created on the back of the dining room chairs. The dining room has changed since this, but I kept the fabric from the back of the end chairs in case it could be used for something else.


If the fabric is flat you could do this in a few different ways. But this is upholstery weight and has texture to it.

After you find a design that you want to use and have it on your computer, you can print it on iron-on transfer paper. Then using small scissors, cut around the design.

As you can see I did not cut out all the white areas inside the design. There was enough white in the fabric to make it work anyway. Of course it didn't show the white as much as in the picture which is enlarged for you to see the details. It also is a delicate design and would be much more difficult to work with if I had cut out all the inside parts.

Lay it out, and iron it on. That easy!

See Y'all Soon!

~ Beau Bunny Art Print Winner ~ Halloween Blog Party!

Selasa, 20 Oktober 2009

The Winner is Shell

Blogger Shell said...

I loved your post with your white pumpkins and smiling cats. I think I have fallen in love with your Beau Bunny Bandito.

Congrats! Beau will be on his way as soon as I get an address to ship him off to.

THANK YOU
to everyone who left a comment.
You made this year's party a blast!!

~ Building a Faux Fireplace

Senin, 19 Oktober 2009


27

I have a soft spot of Euro antiques. Usually they are not in my price range, but sometimes I get lucky.

The thought of something special traveling such a far distance from a European country and then somehow finding its way here to the states is always a tale that warms my heart. I understand those who prefer their treasures from the past from our country as well. It's just that I have a love for the ones from across the pond.

I only have a few... Irish, French, English & Italian treasures ... a couple of Minton tiles, some dishes, a chandelier, a table & cupboard, and this fireplace mantel that was destined to satisfied my longing for having a fireplace in the living room.


A fireplace is one of the most important design elements that you can add to a room for beauty and warmth. The architectural statement of a fireplace is loved and desired by most people when seeking a home. But there was no real need for a working fireplace in my living room. We have a nice large one in the family room where the television is. And it is fired up often from the time the temperature goes all the way down to about 50* for the first time each year until Spring when it warms up again.

I never lived in a house with a fireplace before this one, so I'm making up for lost time. If the rooms were larger, I would be tempted to have one in each bedroom or bathroom as well.


The antique insert was in excellent condition. The dealer had completely restored it. Although the gray was not what I needed, it was the perfect base to build on.


The first thing I did was paint most of it white, and part black to accentuate the half-round opening.


I probably had a hundred pictures saved of fireplaces and I could easily have 10 or so in one house just to implement the designs that I love. The look of French and Italian fireplaces still is the most beautiful to me, and I have never tired of this one. It makes me sad to image one day someone will move in my house and might want a mid century modern look, and rip it out.


I began the design around the antique piece we purchased at Renninger's, and all the dozens of pictures I had accumulated. If you are not very handy with miter cuts and measuring, you could have a trim carpenter (or a great husband) match pictures that you might be saving. Sweet Hubby did all the work for me. He not only did a beautiful job with it, but enjoyed it as well.

It is the mix of the details that exist on the original antique piece, the added plaster and resin elements and all the moldings that makes this so beautiful. We added moldings to blend all these different elements into one design.

He built a box above the mantel with angels to mimic the ones I found from France and Italy. In order to add to the realism, we made it so that it came out from the wall a little bit, although it would be more realistic if it was thicker. I just didn't have the floorspace to spare.


You can see that the top of the mantel is cut with a curved design.


The plywood above the fireplace was covered
with layers of drywall mud to give
a stucco/stone effect.
Then it was primed and
painted in a Faux Stone finish.


This is a close up of the
details on the original piece
where it is painted white
then antiqued.


The inside of the firebox is a small piece of plywood
painted like a gray brick.
I found a metal "scrollie thing" that I painted black
and used some "rub-n-buff on the details of it.
This was fitted on the inside of the opening.

14

The larger corbels are resin, again painted
to an aged, antiqued white look.

16

Detail shot of the bottom.
Shows the mix of wood moldings
wood boxes, and resin pieces.


The beautiful piece in the center is plaster.
Painted & Antiqued for an aged look.


Hope you enjoyed this one!
See Y'all Soon!!

~ I'm a Flea Marketeer Blog Party! with Flea Market Style Magazine

I would be much more into flea markets if there were any fabulous ones here like I see from the pictures of California and a few other places. I try so hard not to be too jealous when I see rows and rows of such wonderful things.

Although Renninger's in Mt. Dora has a "flea market" area along with the Antique Market Place, it does not compare. Instead of all the great vintage goods, you will find cheap t-shirts, knock-off handbags, tons for dollar store type junk and a few great little booths with more vintage goods. I have found a few treasures over on that side of the shopping area.

It is quite different during the Extravaganza. There are vendors set up as far as you can see, and it is "flea market" style. And this post reminds me that it is right around the corner!


One of my best and favorite finds came after going to the flea market area for plants and coming back to the main buildings. This beautiful English fireplace mantel.


The start of a faux fireplace.
This is the next post,
come again for the updated pictures.

Flea Market Style Magazine
Flea Marketeer Blog Party!
Check out all the Blogs.


** Renninger's Extravaganza, Mt. Dora, FL
Nov. 20, 21, 22, 2009 **

~ Halloween Blog Party 2009

Sabtu, 17 Oktober 2009


The Decorated House : Halloween Decorating Black and WhiteThe day started out so sweetly and calmly.
Let's decorate for Halloween .....and get ready for the Big Halloween Blog Party.


I made a new version of last year's Monogram White Pumpkin.

The Decorated House : Black and White Halloween
But then all heck broke out!
CONTINUE READING

~ Halloween Decorating, The Phantom or Beau Bunny Bandito?

Selasa, 13 Oktober 2009

Someone left their mask behind. As much as I love the Phantom of the Opera, I suspect that Beau Bunny is the one playing around with the decorating.


A short time ago, I gave limited licensing rights for pendants charms to Diane at Two Charming Chix for Beau and some other art. When she sent this sample of her work of Beau the Bandit, I was absolutely delighted. Her worked is so well executed and I am very pleased with how it turned out. This one is 1.5 inch square, and is a glass soldered pendant charm.

Last night Sweet Daughter's car was broken into in her driveway and it reminded me that I need to get things in order and clean the darn garage. Such a broken record, that's for sure. After all a garage is for the car right? Sweet Daughter's garage is usually very clean, but she had some bags of yard stuff waiting for pick up, from finishing up laying some sod. So her car was outside. Lovely, small neighborhood, but just one of those things. A lesson for me. My car should be in the garage, which means I should clean it!

See Y'all Soon!

~ Painting Faux Pumpkins, Halloween White & Black

Kamis, 08 Oktober 2009


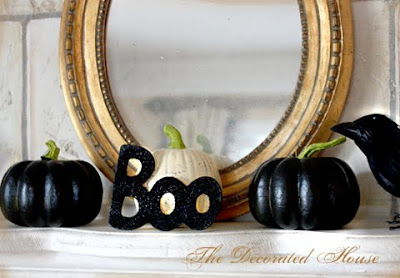
For the last few years my Halloween decorating has been black and white on the inside of the house, with regular pumpkin colors outside. It's so easy to find great buys on the orange colored pumpkins and many of us have lots of them left over from previous years. This post is from last year, and has a little simple how-to for painting those faux pumpkins. This is the quickest and easiest how-to ever!


Black Faux Pumpkin How-to:
The little pumpkins were either green or orange ones that I bought years ago. I liked the shape and I'm really looking for ways to reuse anything so I don't add to the garbage in the world.

These are the foam ones that are so cheap.
(They are not shiny, it's just the light from the window.)

The secret is Fusion Spray Paint or Rust-Oleum Universal Spray Paint
(and now updated: Annie Sloan Chalk Paints, too.)
 
Both are made for painting plastic, but I have found that both are some of the best all around paints.
I've painted wrought iron outside and it holds up very well. It is also excellent on wood.

By now these speciality pants aren't  much of a secret and so many people have discovered what great coverage they give. Some spray paints can react with foam, but are OK on plastic. I've tried other brands which were not as good. They just don't stick to or hold up on plastic.

The stems I painted with the black first because it is like using a primer. Then I used simple bottled craft paint in a lime green for the stems.


See Y'all Soon!

 ................................................................................
Click on any of the pictures below to shop  art from The Decorated House 

~ Halloween Decorating, The Missing Pumpkin Jack O' Lantern

Jumat, 02 Oktober 2009

It's October so everyone now has permission to talk about Halloween all they want!
You are not the only one if you get grumpy seeing Halloween merchandise put out way too early. I have always been that way, but now I have gotten over it. We need the supply stores to have their goods out early so everyone can get busy with crafting and creating their holiday lovelies. And of course we need the candy out early so we can get the Snickers before they are all gone.

This is my busiest time of year so I'm doing a little repeat. It's the story of my missing Jack O' Lantern. Today I was again trying to figure out where I put him for safe keeping. I love this pumpkin because he is so unique and has a little age on him now.

See Y'all Soon!
...........................................................................................

This time of year is so much fun that you can feel the excitement in the air. All the little (and big!) kids waiting as patiently as possible for that big day. Chocolate Day! OK, so maybe it's really called Halloween.

Last year I really thought that Sweet Hubby had broken my "almost vintage" pumpkin Jack O' Lantern that I loved so much, and of course I was sad about it. It's been with us since the early 80's. Only "vintage" by some loose definitions of today. Somehow even the 80's seems like vintage these days. The wonderful pumpkin is fashioned more like those which are older. The jack o' lantern was handmade by a potter. I don't remember his name, nor any of the other things he made for our shop. But I love how it is obviously handcrafted and not mass produced from a mold, even though I do have some of those, as well.

I decided to look again for the missing pumpkin. When I asked Sweet Hubby if he had seen it or remembered breaking anything that looked like it, he said maybe he had ..... seen something broken that could have been a pumpkin. Sweet man, confessing just in case. But then I found it! Right where I thought it was supposed to be. Of course I'm sure it was in a parallel universe. Somewhere, somebody was admiring my wonderful jack o' lantern last year. If "they" do measure time in years or at all, and it was last year for them. I'm just happy that my jack o' lantern pumpkin returned to me and is going to have a special place where he can be seen every day.

He's showing his age these days. He's a little cracked and showing some signs of getting older. But that's fine. He's just perfect the way he is. And I appreciate a few signs of age more each year.