Pages

~ Happy Sunday, Day of Rest

Minggu, 27 April 2008

It's been a crazy month with a bit of stress, so today was day of rest, for one of us. Actually Sweet Daughter had the day of rest, she has the flu. You can only go so long stressing out the body and then it just slows you down as it needs to. I'm remembering how it was if she had a cold when she was little and really loved the attention of homemade chicken soup and ginger ale, and some nice apple and orange cut up in finger size bites. That's exactly what she got today, too. Closing on her first home is Wednesday. I don't think if she gets the flu again she will be resting my sofa. She will be in her own home. So for today, I get to be a mommy, to my quite grown kid.


I have a total fascination with clouds. Their beauty is just amazing. On that last trip to Sanford in the previous post clouds led way to the fun day ahead. Before leaving the house I did a search for any architectural salvage stores in Sanford. Although there weren't any, a shop name came up, Sweet Peas. After a bit more searching I found an address and we went looking for it. The location was a little ways from where we usually go shopping but we found it. Isn't the shop wonderful? I found her blog and recognized the work of Sadi Olive on it. Small blog world.

The store was filled with some wonderful things. As I talked with owner I found out that I had actually visited her previous store when it was closer to where I live, but she had moved it to Sanford.

Isn't that gable fabulous!? I was wondering where I could use it.
The color of this old wood piece was so beautiful. Gently worn and the just the prettiest blue. I'm happy we found this store. I'll be back again. Hope you enjoyed your visit.

~ The Jadite Queen, It's Her Fault

Jumat, 18 April 2008

Don't you love the color and look of vintage Jadite? Me, too. When I saw it years ago, it was quite inexpensive but I wasn't as interested in it back then.

Some lucky people started buying several years ago, before the Jadite Queen showed off her collection. Jadite was sometimes given away free and was often used in restaurants because it was so cheap and durable. Of course it's not free these days. Ever since the J.Queen starting displaying her huge collection on the TV shows and in her magazine, Jadite has become more expensive.


On one of our last trips to Sanford, FL. we stopped in a shop that has rows and rows of cabinets filled with dishes and glassware. We really fell in love with a little vase up there in the middle, a tulip style vase. So pretty, but I didn't really "need" it. Nonetheless I do enjoy the collections he has in his shop.

He told us about when he had his shop further south several years ago and a guy kept coming in to buy his Jadite pieces and came in every time he found some new pieces. And he bought plenty. This man moved somewhere north and continued to contact the shop owner asking for specific pieces. Finally he had most of wanted he wanted. Well, actually he then told the owner that he had all that "she" wanted. You guessed it, the "she" was Martha herself.

I guess more than a few people have blamed him for supplying Martha with so many great pieces which she of course has displayed so beautifully, and since then prices have soared. It's all Martha's fault he says, he just sold her the pieces, she made them desirable.


His dog didn't seem to understand the big deal of it all. It was just a bunch of glass and dishes. This was as worked up about Jadite or anything else that he got.

My Sweet Daughter chose another house. A newer one which needs close to no work. Maybe just a nice glazed white finish on her kitchen cabinets. She seems to think she knows someone who can do it for her. :)
It's a rebound decision after facing how much money and work the older house needed. More than she could do for sure. But I think she will learn to love this one once it is her own.

Thank you all so much for your good wishes for her house hunting!

~ How-To, White Glazed, Cottage, Shabby Part 2

Senin, 07 April 2008

Don't be afraid to try this. Just start small. You will be so happy that you did when you find some old ugly table or something and you can transform it!
Or even a simple resin urn, that can look so much better with a little aging.

(White stone looking resin urn/ raw umber glaze.)

After you've done this finish a few times it is so simple, you forget a few other things to add. So here is a continuation of the last post so you can have some questions answered.

Paint finish:
Use satin finish paint for your basic white, cream color.
Do not use semi gloss for this because the glaze will not adhere to it as easily. Satin is a good choice, but you wish to use a flat paint, then the glaze will absorb very quickly and if it is on areas where you don't want it, you won't be able to wipe it off without it still showing where it had been. If this happens in any area while you are painting, just remember you can go back over it later lightly with the white paint.

Deglosser/liquid sandpaper:
If there is any shine to the piece at all, you can use a deglosser, or liquid sandpaper. Just follow the directions on the can/bottle, they work really well.
One advantage of using these liquids is that they can get into tight crevices where it is so tough to sand. Just make sure to clean it very well beforehand with TSP or Spic n Span, and then let it dry completely.

Glazing to get into all the deep areas:
You can also use an old brush to pounce the glaze into the deeper carved areas. Then you wipe off the excess with your damp cloth, and when it is t0tally dry, you dry brush back over just the highest areas with the same white/cream color or even a bit lighter color.

Topcoat Poly Acrylic:
So what if this is for cabinets in a kitchen or bathroom where you will get a lot of wear? In this case I really love Min-Wax Poly Acrylic Water Based
top coat. You will want to let your finished painting work dry very, very well before applying the top coat. Then 3 coats is great. You can then actually clean your cabinets if they need it with without harming the finish, and it will keep them from getting dirty to begin with.

One of my favorite projects was done by my friend Tammy. She was like some of you and really was a bit scared to try it, but she didn't like her bathroom or kitchen cabinets. She did her bath cabinet first. We talked along the way because it was all so new to her, and then she showed me her painted bath vanity. It was great! But she wasn't sure how it turned out. Why? Because her teen aged daughter told her it was dirty looking. So funny.... aged nicely, not dirty at all. With this new experience under her belt Tammy talked her husband into doing their wood cabinets in the kitchen. Up until then he said no to painting them.

So he did it all the right way. They purchased a sprayer, and he painted all the cabinets. They did a complete kitchen redo while using the old cabinets, saving a ton of money, and it is still an all time favorite redo for lots of people.

If I forgot anything else, I'll add it later. Good Luck with all your painting projects. Just give it a try and don't give up. Everything is easier after you do it a few times.

~ How-To, Painting Furniture & Cabinets, Antique White Glazed Finish

Jumat, 04 April 2008

***
You can see a another post showing an antiqued white finish


The pictures in this post are from a few years ago.
I'll update the post, pictures and tutorial soon.
The technique is simple, and mostly the same
but I don't use burnt sienna in my glaze
very often and more.
 .......................
.......................


I love paint. One of my earliest memories is being 4 years old in kindergarten and painting at an easel. Paint and fairy tales, the perfect combo for a very young artist-to-be. Although I began art with paper, canvas, paints, etc., the usual things, furniture and wood soon followed.
(The final tips and how-to is at the end of the post. )

One thing I've been asked over the years is tips on painting things white for that aged, cottage, shabby chic look. It's actually very easy even though you see it done poorly sometimes. That is only because it takes a little bit of practice to control it so that it looks like it happened over time, on its own. Just don't give up if it isn't what you think is perfect right away. We all start out learning how to make it work.

Sometimes you want the glazing/antiquing to be very light, and then sometimes heavier. You might even want some parts the same piece to have more glaze than other parts.


This picture is of the canopy over the kitchen sink. Sweet Hubby built it for me. Like our other projects, I drew out what I wanted, shopped for the wood, plaster elements and moldings, and he did the carpentry work for me. Then I painted it.


The close-up lets you see that the canopy was painted with a few different techniques. I used a cotton t-shirt, brushes, my fingers, very small artists' brushes, sponge brushes, and most likely the kitchen sink for water.
This part is all wood, except for the grapes. I used a stencil to make an embossed/raised grapes pattern, then after it was dry, I used air dry clay to make each of the grapes so they could be more rounded and dimensional.

I love the look of antiqued rope molding. It's a lot of work to get it just right, but worth it. You go back and forth with the glaze and white paint, dry brushing until you like it.

At first you paint it all white, then take a small brush and paint around each of the rope sections. Sometimes I glaze go over the whole thing, letting the glaze settle in the cracks. You then wipe it off the top areas, before it dries, with a damp cotton cloth. When it is totally dry go back over just the highest areas with this dry brush technique. Load your brush or sponge brush lightly with white, brush it on a paper towel or piece of cloth to remove most of the paint, then go over the top sections of the molding or painted piece you want to highlight.


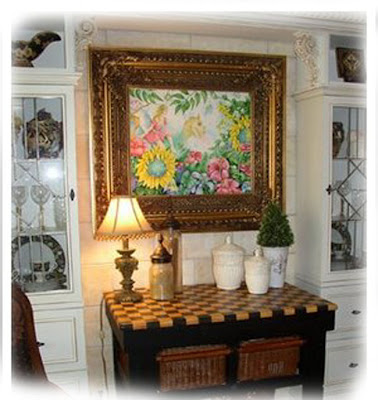
Sometimes you might find something that is already white that like the shape or price. Not old at all, but quite new. These usually look kind of cheap and often aren't real wood. This wall unit was built by starting with 2 storage pieces from Target. They had glass doors and drawers, and it was just so much easier to use them than to find something old.

This time I used a "lighter hand" with the antique glazing to give just a touch of age. This is excellent for doing a glaze on white cabinets in kitchens or bathrooms, and of course furniture like end tables, etc. You probably don't want a heavy glaze on those. Just a light touch, like you would see on good cabinets that you would purchase already glazed.

I used only a small artist brush with a combination of raw umber and a touch of burnt sienna for the glaze. Lowe's has some nice glazes that are already mixed. You can also find small bottles at the craft store if you don't want to try to mix your own. Glaze is usually 3 parts glaze (or you can try just water) to 1 part paint if you are mixing your own. Glaze dries more slowly, but water will also work.

http://thedecoratedhouse.blogspot.com/2008/04/how-to-antique-white-cottage-vintage.html
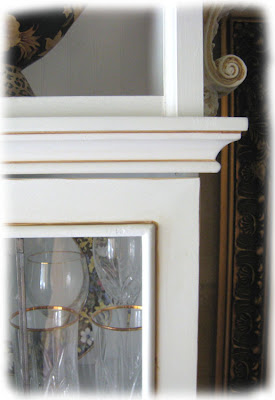
Here you can see that the furniture pieces were left the white, and then I took a small artist's brush and painted my glaze along the lines and crevices that would have accumulated dust and wear over the years if it had been old. You can't draw a straight line??? Neither can I. Keep a damp cloth with you, after you paint the glaze on, take the cloth around you index finger, keep it at an angle towards you (in this picture you would be pointing your finger towards the right with you on the left side) and wipe off the excess. It gives you a pretty even line.
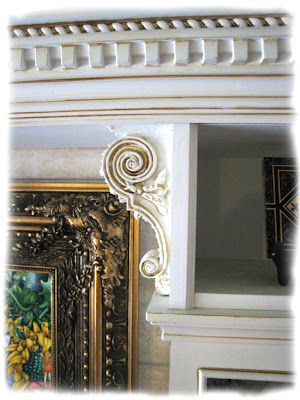
The top areas, rope molding and corbels have a slightly heavier glaze application.

It really is so easy after you tackle a couple of projects, you'll be an expert!
  1. Sand lightly and use a tack cloth to remove any dust. Don't strip it if you are going to paint anyway and you want it to look old.
  2. Prime. I love Kilz spray paint. It comes in a can as well. If your piece is already white you might be able to skip the priming. Patch any holes or places that you need to now, and sand smooth.
  3. Again I love to spray. My favorite spray paint is Krylon, Dries in 12 mins. (maybe 10..something like that) Let it dry longer! Let it sit and really dry because you are going to be doing a wet technique on it. You can also brush on your paint. I like the foam rollers for any area I can paint with them. They give a nice finish.
  4. Brush on your glaze. (Glaze sold as tinted or clear, and you add your own umbers, taupes or siennas to it. I like the gallon can of clear at Lowe's, or the Mocha one by Decorative Effects, Valspar, also at Lowe's. Home Depot has the Behr brand.) The glaze is mixed 1 part glaze to 3 parts paint if you mix your own. Just adjust the amount of color you want by adding more glaze (less saturation of color) or more paint (more color and saturation.) Keep that damp cloth nearby and fresh clean water. As you brush the glaze on the piece, you will be taking it off as well with the damp cloth. This is how you control the amount of antiquing you do. I actually only paint on the areas that are recessed, leaving the white, cream color as is.
  5. You might want to do a little sanding, just be sure you let it sit and dry very well. Otherwise the paint will peel rather than just look sanded.
Have Fun!


See Y'all Soon~
 ................................................................................
Click on any of the pictures below to shop  art from The Decorated House 

~ Lots of Love, Locks of Love

Kamis, 03 April 2008

She was a beautiful little girl. Funny how you don't quite realize things like that when you are just working so hard day to day. By the time she was two years old, she had the sweetest lovely hair that just curled on the very end. Right about 2 1/2, she decided to get a haircut. And she did, all by herself. Just a little pair of scissors and her own little hands. She neatly put the pretty strands of hair in her toy drum. I cried and cried. She was a punk baby! One side of the front was so short it just kind of flipped up, and then there were some long strands left on the other side. I remember her hugging me & patting me on the back as I sat on the floor, telling me...it's OK Mommy.

A few days ago, she went to the hairdresser to get her long hair cut. Very short. Short enough to have a ponytail to send off to "Locks for Love."
She had been talking about doing this for awhile and she finally took the time to let her hair grow long enough to do it instead of going in for her usual trims. It's only hair, she said, it grows back on me. Not on little girls who are going through chemo.

I cried, but to myself this time. Not because her hair was all cut off again. Because of the beauty of her soul and the kindness of her spirit. But it did remind me of the funny episode of her doing her own hairdo so many years ago.

Thanks so much for your well wishes for sweet daughter's hunting. It has been a really difficult and agonizing time. The house she had a contract on had lots of problems, including termites, bad electrical, wood rot, air conditioning defects & mostly no working appliances. It has been heartbreaking to see her go through this. Kind of like ending a bad marriage to someone you love a lot.

There were ducks nearby. She really loves baby ducks. As you can see from the picture she has been crazy about baby ducks since she could walk. She canceled the contract yesterday, and this time it was me telling her it would be OK. I know it will be, but it sure hurts to see your daughter go through these things in life. I'm just thankful it wasn't a defective husband she was canceling. Really. :)

I'm not sure if she is willing to pursue this any further. At the moment we are both worn out from all the running around and stress. It doesn't look repairs are going to made correctly and would have to be done over again. And of course, I'm sure there is another house out there for her. Most likely not with water and ducks in the backyard though.

If you know anyone who would like to donate a ponytail here is the website address. Locks of Love