Pages

~ Bon Appetit! Brownies - French Farmhouse Kitchen & White Kitchens

Jumat, 28 Juni 2013


When I first saw the cover of the latest Bon Appetit magazine, all I wanted was a brownie! As much as I love chocolate chip cookies, brownies sometimes are even higher on the food chain of desire.


As usual this recipe had a bit too much saturated fat for the way I like to cook and eat. I want to enjoy my food without worrying about clogging my arteries. No I didn't think about that sort of thing when I was twenty.

I'm busy working on the kitchen. Not the biggest makeover I've ever done, but lots of things on the to do list nonetheless. As usual one thing keeps leading to another. Hope you enjoy this post with a wonderful and unique French Farmhouse Kitchen featured in Bon Appetit.


The the first kitchen posted here, which is in the same issue as that brownie, stole my heart. So I had to take a closer look. Is it the stove? The cabinets? The sink? How about this antique table? Um, maybe. The yellow isn't my color, but I love the floor and the wood cabinets with white.

The white kitchen above also appeared in Bon Appetit, last year. This time it is easy to know exactly why I love it. The white is fresh and clean looking with the dark stained chairs and floors.

And the same for the Christopher Peacock kitchen below. I don't think I could find a kitchen designed by that man that I would not love.


The most interesting thing to me about the French inspired kitchen in the first picture, is that I'm not in love with all of the individual things in the kitchen, and yet..... I love the space. I feel very at home looking at this space. The sum of the parts in this kitchen, designed by my favorite kitchen designer, Mick de Giulio, is much greater than the parts, for me anyway. I guess I just need to study this one for a little while, as I munch on some brownies of course. It just might be the antique island that calls out to me the most.

....................................

When I first wrote this post I was experimenting with different recipes of gluten-free brownies. There are lots of good recipes that you can find on line. It turned out to be a fairly easy one to come up with. The chocolate hides any unusual taste from the gluten free flours. My favorite is to use ground almonds with a small amount of brown rice flour. Yum!


See Y'All Soon~

  ................................................................................
Click on the pictures below to visit The Decorated House Shop!


~ How to Create a Succulent Dish Garden ~ Tutorial

Senin, 17 Juni 2013

Making a succulent dish garden is one of the easiest garden projects you will ever do. And it is so rewarding for instant gratification, and months or years of enjoyment. The one above is a few months old. It sits in a semi-shade spot and I water it occasionally if it hasn't rained in a while.


1. Select a container at least 4 inches deep.
This terracotta dish is only about $5, and is really perfect for succulents. You want a shallow dish but one that is at least 4 inches deep. You can find these at Home Depot, Lowe's and garden -  nursery centers.


2. Purchase various succulents in small pots.
(Of course you could use cuttings, but this takes longer and more patience.) These vary in price from the smaller peat pots starting at about $2 and then up for the size and type of plant.

3. Cover the bottom with gravel
4.  Then add cactus potting soil.
5. Moisten the soil before adding the plants.

6. Plant each succulent to the same depth it was in its pot.
......
Do not water again until the soil is dry.

Because we have so many days above 90* in the summer,
I do give my succulents a sprinkle about once a week.


Just as with any gardening, look for colors and textures
so you will have a more beautiful combination.


A wonderful bonus is that some succulents have very pretty and vibrant flowers.
Not usually very large, but pretty none the less.


There is no need to water again when starting your dish garden if you began with moist soil. The garden can go without water much more easily than adapting to too much water or rain.


The cuttings should be allowed to sit and dry a bit before starting them in soil. Then they like a constant lightly moisten soil to root before they will be like the grown plants which need much less water.


The stonecrop succulent in the hanging basket is an example of a really pretty succulent that can take a bit more water and be use with other plants that require more water. It is the pretty spiky plant spilling over the edge.

If you go through a very rainy period, then move the dish gardens where they are able to stay dry or do as we do, cover them with a tarp.  In the winter, they do need to be brought inside or sheltered when the temps go below 45* or so. In warmer climates like ours, they can stay outside all year long.
...................................

Growing succulents indoors can be a bit trickier.
* They need a lot of light and they also like a hot and dry environment.
Be sure to turn them so that the entire plant receives the same amount of light.
* A terracotta container works great since it breathes and can let the soil dry easier.
* They need special cactus soil. They don't do well in plain sand. I have cheated and mixed
some regular potting soil with nutrients with my cacti soil, and it has been fine though.
* Water thoroughly with lukewarm water, and then let them dry between water waterings.
* When you take them back outside, don't put them in full sun right away. They can get sunburn

Lots of good info for growing them inside and outside here at Desert Gardens.


For some stunning pictures and ideas
for growing succulents visit my
friends at Atelier de Campagne
and this post showing some beauties.
........................

See Y'All Soon~

  ................................................................................
Click on the pictures below to visit The Decorated House Shop!


~ How To Create a Faux Cement Paint Finish ~ Urn & Succulents Gardening

Rabu, 12 Juni 2013


Pretty succulents
growing in a covered area on the small porch landing by the back door,
in a "new" faux cement urn, made from an old plastic pot.

Update: June 2013
It's been  exactly a year, and the urn has been on a cover porch area
 and it looks exactly like it did when it was first done.
The only changes have been keeping the plants to a nice size.
The aloe grew very largeand has been cut back.
The other succulents have been
clipped as need, but all are doing well!
I have some other containers which were more open to the elements,
and they look great and have just "aged" more with the rain
and humidity.

Come Back Soon for more
Reader's Favorites.
:::::::::::::::::::::::::::::::::::::::::

After going without rain for some time and spending so much time watering to keep all the pretties alive, we had a few days of non-stop rain. Another downpour early this morning, before the plants could dry out even a little from the last few days. Mother Nature teaches us patience or why it's good to buy plants where there is a one year guarantee.

Click on Link Below for the Instructions:


CONTINUE READING

~ How To Make a 5 Minute Pillow ... Maybe 10 Mins.

Sabtu, 08 Juni 2013


You can make a pillow like this in 5 minutes! Maybe 10.
Tutorial & Step by Step Directions:
-------------------
Read on to see another one of my Reader's Favorites
(Click on the link below to read more!)

CONTINUE READING

~ How To Upholster a Simple Chair Seat Cushion

Senin, 03 Juni 2013


DIY - Tutorial - How To Upholster a Simple Chair Seat.
Readers' Favorite Posts
..............................................
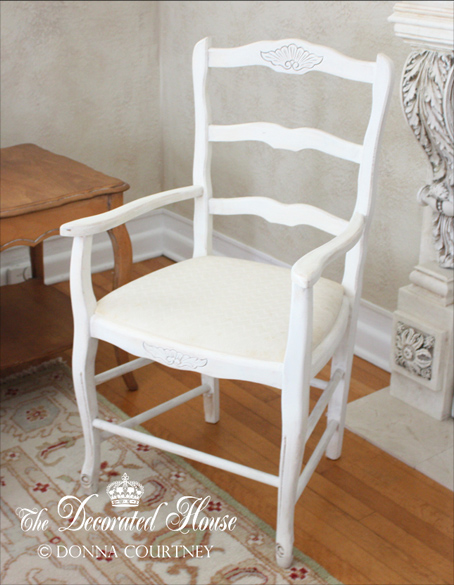
When you last saw this chair it was a very distressed paint finish of blues to gray and white. Shortly afterwards, everything went almost back to neutral in the living room, including the little Italian made French style chair. The off white suits me much better. It is now painted a mix of Old White and Pure White Annie Sloan Chalk Paint. (If you are not familiar with the product, this is not "chalkboard" paint.)


As is usual for my changing desire of color,  I needed a burst of color again as noted in the last post of the very quick blue and white pillow made out of the same fabric. This is not the fabric I thought I was using for this quick change the living room. Instead it was one of the two companion fabrics that I liked much more once I had the larger pieces home. I'm sure the other pieces will find some other fun projects to suit them.
This is a really simple project. Here's how you can do it, too. Click on the link below to read more.


CONTINUE READING