Pages

~ Wishing You A Very, Happy New Year!

Selasa, 31 Desember 2013

The Decorated House ~ Happy New Year. New Year's Decorating Mantel in Black and White with Mercury Glass

New Year's Mantel 
Black & White with 
Silver and Mercury Glass.
-----------------------------------
 To all of you have come by to visit over the years, 
and to those who find their way here 
for the first time as well.
 I wish you
 a very Happy New Year 
filled with  Peace - Light - Love - Joy!
(last year's mantel for you to enjoy)

See Y'All Soon~

~ Merry Christmas! from Our Home to Yours

Senin, 23 Desember 2013

The Decorated House ~ Christmas Mantel Decorations 2013

From Our Home to Yours,
Wishing you all the Joy of the Season.
Merry, Merry Christmas!


~ Christmas ~ White and Silver with Mercury Glass

Rabu, 11 Desember 2013

The Decorated House ~ Chrismtas Decor Decorations White with Mercury Glass and Silver 2013
 
Each year it is a joy to share our Christmas decorating  with new and old friends who stop by this blog.  The colors are much the same this year in the living room, lots of white and silver, with accents of Mercury glass,  and a little touch of black. The tree is filled with a few overprice ornaments like the Mackenzie Childs stars and a few Radkos, but much more you will find the very inexpensive ornaments like the snowflakes and the black and silver ornaments that I painted to go with the stars. Snowflakes and baby's breath bring more white and light to the beautiful green of the noble fir tree. This year's tree is topped with
CONTINUE READING

~ Christmas Tree with Purple & Green

Selasa, 03 Desember 2013


Has your decorating style or colors changed over the years at Christmas time?
My style is lighter and more simple in the last few years,
but I still love seeing these rich colors and gold for Christmas.
 What a pretty combination  lime green and purple is.
This was in 2005.

Now it's time for the 2013 tree, 
which needs to be decorated yet!
I'll be back soon. 
Happy Decorating!

~ See Y'All Soon ~

~ White Pumpkins - Soft & Light Fall Decorating

Senin, 11 November 2013

The Decorated House ~ White Pumpkins Decorating for Thanksgiving

Happy ThanksGiving!


 White Pumpkins for Fall Decorating

The objective was to use as much of the elements of the Halloween
decor for Fall decorating as possible. So all the things associated
 with just Halloween were put away, but anything that could still
be used for Fall is still here of course.
The Mercury glass and silver are still hard at work 
showing off the white pumpkins in a
 very simple and soft arrangement.

The soft white velvet pumpkins
and painted pumpkins,
 using Annie Sloan Chalk Paint
in Old White & Pure White.

The Decorated House ~ White Pumpkins Decorating for Thanksgiving
Autumn leaves and a rusty antique key along with the antique
books give a sweet nod to the season of beautiful warm colors.

A velvet pumpkin is adorned with a vintage rhinestone brooch,
and sits in a vintage silver sugar bowl
on top of antique books 
The old skeleton keys make appearance
throughout the year as well.

~ See Y'All Soon ~

~ How -To: Black Glaze on Kitchen Cabinets or Wood Furniture Update

Jumat, 08 November 2013

The Decorated House - How To Black Glaze on Kitchen Cabinets or Wood Furniturehow-to-black-glaze-on-kitchen-cabinets.html

Over the years some posts on blogs get a lot more views than others. And some of those posts will continue to get quite a bit of interest year over year. How to do a  Black Glaze on your wood Kitchen Cabinets has been one of those posts here at The Decorated House, both on this blog and on the original site over 13 years ago.


Before doing the Faux Bois finish, we added the moldings and painted the cabinets all white. The cabinets are all solid wood, and in good condition and back then it didn't make sense to me to get cabinets that were not all wood to replace them. After 10 years I was tired of white and really would have liked some nice upscale solid wood cabinets, but that was a lot more expensive than what I was willing to do.

Instead, I found books (this was before all the diy stuff hit the internet) and decided to try my hand at faux bois paint technique. That was about 13 years ago. The finish has held up extremely well.

The kitchen mini-update was supposed to be quick and easy. You know how little projects can take a lot more time than you thought. And although the cabinets still look pretty good, I wanted to give them a freshening up. The doors were all removed again, and I redid all the black glaze. The insides of the cabinets got a coat of paint, and new storage organization was anywhere I could fit it into the odd and sometimes small spaces. The mini update is still going on, but I think an end may finally be in sight.

As I was writing the post,  I showed this before and after picture to Sweet Hubby and he wasn't skeptical for a moment that it was really the original kitchen until he realized the same size window is still there. The picture is not that good, but I think you can get the idea. They were built in 1959 and they looked the same although a bit worse for wear in 1986.
How -To: Black Glaze on Kitchen Cabinets or Wood Furniture - The Decorated House
If you have wood cabinets
CONTINUE READING

~ Over 50 Fabulous Black & White Halloween Decor Ideas

Selasa, 29 Oktober 2013

Some great ideas for last minute decorating or filing away for next year.  
Click on Picture above to see over 50 Halloween Decor ideas. 
Click on each picture on Pinterest to go to the source site.


~ See Y'All Soon ~

~ Halloween Decor :: Vintage & Elegant :: Black & White with Mercury Glass :: Entry Table 2013

Sabtu, 19 Oktober 2013

Entry ~ Halloween 2013

The entry table is another favorite place to decorate for the holidays.  I shared photos highlighting some of the different elements that are shown here in  previous posts that can bee seen by clicking here:  Details of My Velvet Pumpkin The Monogram Pumpkin with Paper Butterflies

The Mercury glass pumpkins and gourds are a really wonderful addition to Fall and Halloween since they add a touch of elegance and reflective light. And if you have come by in years past, you know those little silver crowns get used as often as possible when a little bit of silver is sure to add a sparkle.


The foyer table is black marble and has a simple burlap runner on the top for  texture and feeling of Fall. To complement the other black elements, there is  a tall black urn holding one of the painted white pumpkins. The pumpkins were painted a couple of years ago with ASCP and simple white paint as well. The pumpkin on the antique books and the one on the vintage silver piece are both velvet pumpkins which are newly made this year. I showed how I made mine HERE.  The small black pumpkin is a faux pumpkin that was painted a few years ago with spray paint. Look for the kind that will work on plastic, like Fusion and Universal. Both will give you nice coverage. Of course if you have some black ASCP it will work too.


 Ravens wear collars, and the spiders wear glitter.


Antique books and a garden urn with a Mercury glass gourd on top,
with a Mercury glass pumpkin sitting on a black and white pinwheel made of wired ribbon.
A little silver crown and antique skeleton keys round out the display.


 The other raven wears a fun harlequin collar.


 The vintage mirror is lightly wrapped with white web while glittered spiders climb to the top.


 And Velvet Pumpkins add another little touch of elegance and texture.


Black and White Paper Butterflies and Spiders, too. 
These Velvet Pumpkins have real (dried) pumpkins stems. 

Partying with Stone Gable. 

See Y'All Soon~


~ Halloween Decorating - Mercury Glass with Black & White

Senin, 14 Oktober 2013


I hope you had a  wonderful weekend.  If you have missed the Halloween Decorating around here during the last week, here is a little recap. You can find the posts and pictures at each link beginning  with The Pumpkin Topiary  and The Monogram Pumpkin with Paper Butterflies and Details of The Entry Table featuring My Velvet Pumpkin and the last post was of the Halloween Mantel Decorated for 2013.

~ See Y'All Soon ~

~ Halloween Decorating - Black, White & Silver

Selasa, 08 Oktober 2013


Adding a few vintage elements always seems to bring that special feeling of age and beauty to Fall and Halloween Decorating. The entry table is dressed in a little bit more black this year and Emily Grace is wearing her special hat for the occasion as she awaits the big day with her black kitty and  rave, along with her favorite jack o' lantern. (The Little Victorian Witch Art Print, Emily Grace,  is available HERE.)

The pretty velvet pumpkins that I made this year for Fall and Halloween add a lovely soft texture to complement the sparkle of the Mercury glass pumpkins and gourds. Its a wonderful combination. The velvet pumpkins have  a very subtle texture and soft coloring that makes them feel a bit vintage,  even if you know they are new.

While unpacking the seasonal goods, I found some black and gold frames which were waiting to be painted in lighter color. For Halloween they are perfect the way they are. I might have to keep a couple the way they are and pack them away with the Halloween things.

The stack of books starts with an antique Italian vellum book from the 1600's which I use all year around. The vintage book stack is topped with a white garden urn holding a mercury glass gourd. Sitting on the edge of the books is a paper and velum butterfly.


The ravens got a little dressed up this year as well. One wears a handmade lace color, while the one in the top photo chose a black and white harlequin collar. That one was made from a wired ribbon. Cut off one side making it the width you need, and pull the wire in your cut piece to make the ruffled collar.
 
Rounding out the display for the entry table is a tall black urn that was also tucked away and mostly forgotten. Now it is the perfect place to have another white pumpkin. This one is a ceramic one painted with Annie Sloan Chalk Paint (Old White and Pure White) but a foam pumpkin would work was well.

Come back soon to see more Halloween Decorating for 2013.

See Y'All Soon~

~ Halloween Decor - Pumpkins - Butterflies - Spiders! Oh Yes!

Minggu, 06 Oktober 2013


What a funny and strange sounding combination. Pumpkins with spiders and butterflies, and a crown or two of course. This weekend seems like the perfect time to get out all the Halloween goodies and get decorating. Each year I wish I had started sooner so I could enjoy it all for a few weeks before Halloween. This year I'm actually going to do it.

The monogram pumpkin is still one of my favorite things. So simple to add a design of some kind after you paint one of the faux pumpkins white.  Each year I get questions about it, but it really is simple. This is a design that I created using a vintage letter, then it was printed out on my inkjet, cut out closely to the image, and glued on the pumpkin. For this I used Golden's Gel Medium, but you could use Modpodge as well.

In this little area the pumpkins are the large white painted pumpkin with a sculpted stem from paper clay, a small black painted pumpkin with a faux stem, and a cream colored velvet pumpkin with a real pumpkin stem.  Add some glittered spider and velum paper butterflies and it's a fun start to the entry table this year.

You can click HERE to see last year's entry table. It was just what I wanted so it was a little hard changing it up this year. But once I brought out  that large urn you can almost see in the background, everything began to take shape. Kind of the same, and a bit different.  Come back soon to see more clips of Halloween decorating, and then a post of all the elements of the whole holiday decor.


The shop is full of fanciful ~ whimsical ~ fun
Halloween Art Prints featuring Beau Bunny and Friends.
All orders are sent out quickly and 2 or more prints
are mail via Priority for an extra speedy delivery!

Have a Great Weekend!
See Y'All Soon~

Linking up with My Romantic Home this week.

~ Hello October ~ Countdown to Halloween! Pumpkin Topiary

Rabu, 02 Oktober 2013


It is the joyful month of October! One of the fun things I've seen around Blogland in the last few years is  the different inventive kinds of a count down "clock" for kids to count the days until  Halloween. I wish someone had thought of that when I was young. It would have made this fun Holiday last longer. Even if there is no count down clock around here we are still on Halloween watch anyway. And the fun is just about to begin. With just one little project at a time. 

For the last few years there has been a pumpkin topiary somewhere in the decor. I like the combination of the black and white with a little soft pumpkin color too. The light streaming in through the window bounces playfully around the silver pieces and actually makes the matte black pumpkin a bit shinier looking in the photo. This year I made the topiary in a Mercury glass goblet.  The Mercury pumpkins are a delightful addition again this year. The fun reflective sparkle certainly brightens the mood Fall, and adding more Mercury glass pieces just adds to the reflective light.

You can make a topiary of your own out of faux pumpkins that you can keep and rearrange year after year. The bottom white pumpkin and the top peachy gourd are both ceramic, but you can easily use foam ones instead. It best to use a foam one for the middle, and maybe the top as well, because you might need to poke a hole in the bottom if the pumpkin below it has a stem that you want to hide. I used some sticky putty to keep the top one in place since I could not poke a hole in the ceramic gourd.

The pumpkins started out that ugly orange color that most inexpensive faux pumpkins are born with. For the white pumpkin and soft pumpkin colored gourd I started out with Annie Sloan Chalk Paint in Old White. The white one was then dry brushed with some Pure White. The gourd was painted with Old White mixed with red and yellow to get the soft pumpkin color, then dry brushed with Old White. The black pumpkin was spray painted with either Fusion or Universal black paint.  Both spray paints are very good for painting the foam. Of course you can also use a liquid latex although you may have to touch them up over the years if you don't use a primer.

Come back soon to see more clips of Halloween decorating, and then a post of all the elements of the whole holiday decor.


~ See Y'All Soon ~

~ The Decorated House Halloween Decor - Mantel 2013


You can hear it all throughout Blogland right now, almost everyone loves this time of year. As I've said before, I am no exception.  For me it is another reason to be joyful and celebrate everyday. And to at last cool down a little bit and open the windows. And ..... to decorate the mantel for Halloween!
This I totally love doing. It's a chance to embrace magic and whimsy and just remember the fun of being a kid this time of year.
CONTINUE READING

~ A Little Fall Home Tour ~ Vintage with New - Decorating the Fall Mantel

Kamis, 26 September 2013

 
Fall Mantel 2013

Fall is in the air, even way down in the South. We too are being coaxed to embrace the new season, ever so gently as each morning is a bit cooler,  just a little bit.  

The Fall Mantel reflects our Autumn. The large sycamore leaves are just starting to turn and lots of green ones are already covering the ground. Shades of rust are still mixed with the beauty of green, and yellow is showing off,  too.

It seems like just about everyone is eager to see Fall this time of year. The days are shorter,  but the evenings are cooler and the promise of stunning colors of leaves and sunsets woo us into the new season. I am no different except I walk slowly into this time of year relishing the last days for summer, and the evening walks with the sun still shining.  But Fall is one of my most favorite times as well. 


 Several years ago, an artist created 2 custom paintings for me, this one with the terracotta pot and chipmunk (I'm not a farm girl if I have my critter wrong) and another one with a pretty baby blue bird. He asked what animals and colors and I wanted and this is what he painted. They were perfect for the way I decorated years ago. Sometimes when you put something away for a while, it is extra special all over again when you find it. And so it is with this delightful painting. 

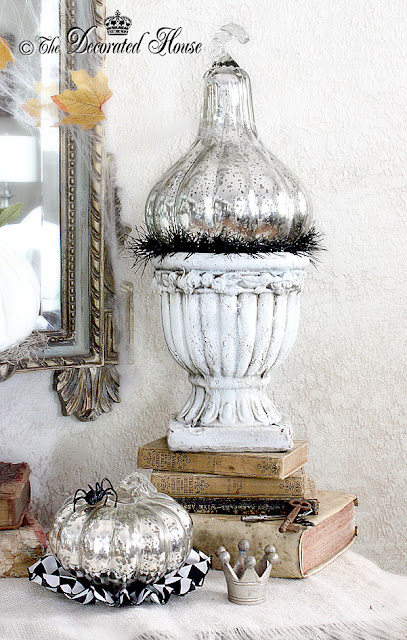
The mantel is a charming mix of vintage and new. New leaves, both real and faux, playfully accent the fabulous handmade pottery pieces, vintage green pottery, silver and antique books. The peachy colored gourds were painted with Annie Sloan Chalk Paint and other acrylics last year. The colors are still perfect for my fall decor. 

Bowing to the beauty of nature, there is a real bird's nest in the center with the original white cottony type element that the bird used to build it. This was a rescued, abandoned nest we found several years ago and which I use very often just because I love it so  much .


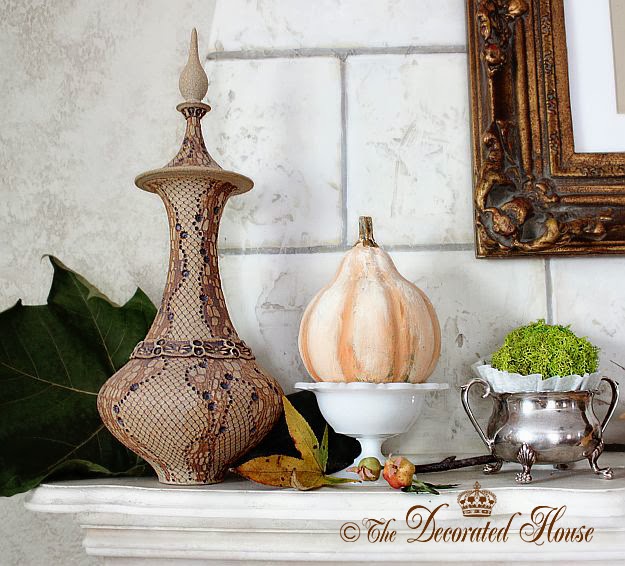
This vase is the last piece we collected. The sister vase to this one was purchased more than 20 years earlier. When we found the same artist at a large art show, we fell in love with this lidded vase and added it to our art pieces. At that time I was using a lot of brown as an accent color. Bringing it out to a new setting and time  makes it special to us all over again.  Here is is shown with vintage silver and milk glass, and ASCP painted  pottery gourd,  a moss ball and some sycamore leaves.


Thanks for stopping by and sharing some Fall decorating with me.
I have a few more Fall decor pictures, so come by again.

See Y'All Soon~

~ How -To :: Annie Sloan Chalk Paint - French Linen Basket Makeovers

Rabu, 28 Agustus 2013


Basket Makeover Using Annie Sloan Chalk Paint - French Linen

Another way to store things in the kitchen is by using baskets. 
This is a very old solution that still works in today's kitchens as well. 

When choosing storage options for the kitchen, baskets are always tops on the list for many people. And for good reason, they not only add a nice hidden storage solution, but they can also bring in a touch of warmth, color and/or texture.  Somewhere along the line, I had a "collection" of sorts of these very inexpensive baskets. There were mostly out of sight, but they were also exactly the right size for a shelf area where we needed quick access to things like keys and they are in easy sight so something needed to be done to them, just to pretty them up a bit. 

So out came the ASCP again!  I've had the French Linen Annie Sloan Chalk Paint for a while, but never found the right place to use it for any accessories or furniture. However, when I tried it with the new colors in the kitchen, it was a perfect complement.

You can see from the before and after that a little bit of paint makes a big difference.
CONTINUE READING

~ Small Kitchen Storage

Kamis, 22 Agustus 2013


Where to put those small kitchen appliances??

Work in the kitchen is continuing. It is taking a great deal more time than I had planned. Maybe it began with the slightly crooked drawer which was a learning experience to figure out how to make it perfectly straight. Or it might have been the desire to have more pull out baskets in the cabinets and to make them all match. It's hard to remember what started this latest episode of the kitchen redoing. The more work I've done, the more it seems it might have been easier to have just torn the place up and cabinets installed. I just didn't want the kitchen so torn up that I couldn't cook for more than 24 hours. I love to cook, and eat!


After all the work, I'm not even sure too many people would notice there is a difference! A lot of work has been on the inside, reworking the limited cabinet spaces with more pull out wire baskets, adding more turn tables, painting the insides as needed and just trying to get more organized and less cluttered.

When the new refrigerator came a few years ago, it turned out to be less than 1/4 inch too wide to fit in the space intended for it. So we brought in this white "hutch" that was once used in the living room in it's original natural wood finish, and years before that it held a TV. Yes, televisions used to be smaller!  It had been painted white at some point in time, but need repainting to match the other white in the kitchen.  It certainly filled up quickly with things from the kitchen. And since I have almost no drawers in this room, having 3 nice size drawers was very welcomed.

When I was tired of getting the big mixer out of a lower cupboard one more time, it was moved here where we kept other small appliances that we use on an almost daily basis. Instead of worrying about having these things out in plain site, I'm going to just embrace the convenience and the pretty lines of these work horses in the kitchen.

~ See Y'All Soon ~

~ French Chair ♠ diy ♠ Painted with Annie Sloan Chalk Paint

Senin, 22 Juli 2013

The Decorated House - Tutorial Annie Sloan Chalk Paint on French Chair

Looking for a really rustic, distressed French Blue look? Try this method.
CONTINUE READING

~ How to Make a Pottery Barn Style Monogram Pillow, DIY

Kamis, 18 Juli 2013


This is where I used one of the last flowers I showed you how to make. It adds a lovely touch to the Pottery Barn style pillow. How to make the fabric flowers can be found here and here and here and here.

The pillow here is a simple envelope closure style pillow cover. I have written a tutorial on it here

1. Choose a simple flat weave fabric like a cotton or linen for this project. My pillow is made with a    medium weight cotton. You can use a linen or cotton or blend or any plain fabric you like.

2. Find a font that you think would look good as your monogram, but also one that will be easy to cut out.  Play with the size of the capitalized letter to see who large you need for your pillow or project. Just print it out in draft mode to save ink, cut it out and see how the size works for you. 

3. Print out your letter on plain paper. Then cut the letter out exactly how you want the monogram to look on the pillow. 

4. Lay the cut out letter on top of a piece of felt. If using white felt as I did here, use a pencil and lightly trace around the letter remembering the inside parts as well that need to be cut out. 
If you are using a dark felt, you can just a piece of chalk to trace the letter. 

If you use felt, there is no need to hem or fix the edges. When using a different fabric you will need to hem it, or use a no fray liquid on it.

5. Attach the letter/monogram to your pillow with fabric glue or by lightly sewing it on.

Then if you wish, you can either embellish at little like adding the fabric flower or just leaving it with the monogram alone. 


See Y'All Soon~

~ Queen Bee Digital Art in the Shop! With BeeHive & Paris

Jumat, 12 Juli 2013


Queen Bee Art with Paris, Crown and BeeHive

There is a new Queen Bee Digital Download in the shop.
Thank you to the nice people who
have asked for it.

Hope you all have a 
Wonderful Weekend!
See Y'All Soon~

~ Liberty Enlightening the World - The Statue of Liberty

Kamis, 04 Juli 2013

The Statue of Liberty

Celebrating Independence Day, I am thinking of all those who made such a huge sacrifice in the revolution to make the United States a country unto its own, separate from England. My ancestors who fought in the Revolutionary War, and those of many of you, believed they could be a nation of states united and free to make their own way as a new country.  A remarkable idea at the time.

Without France, our destiny may have been quite different. The French people also sacrificed greatly for our independence, even if they had little say about the help that came to us. The gift of the Statue of Liberty is a special reminder us of so much. 

The Statue of Liberty (Liberty Enlightening the World; French: La Liberté éclairant le monde) stands on Liberty Island in New York Harbor. She is a colossal size neoclassical scuplture of a robed woman who represents Libertas the Roman Goddess of freedom. She holds a torch in one hand, and a tabula ansata, or a tablet evoking the law, in the other on which is inscribed the date July 4, 1776. A broken chain lies at her feet which Bartholdi decided not to have her holding . This beautiful piece of art was named and designed by Frédéric Bartholdi and dedicated on October 28, 1886. The statue was a gift to the United States from the people of France as a symbol of our countries' friendship.

The Statue of Liberty Paris 1886 - The Decorated House July 2014 
1886 The statue being created in Paris.


The Statue of Liberty
1886, the top of the statue in Paris

The Statue of Liberty - The Decorated House July 2014
The original copper finish. 

  Statue of Liberty - The Decorated House July 2014

Here you can see patina and oxidation of the copper as we see it today. This is after a long and painstakingly difficult job of cleaning years of dirt and grime. It took many, many years for this statue to be truly appreciated, but today it certainly is.  And it is still a  stunning piece of sculpture, with fabulous patina!

It was, and is, an incredible gift from the French people.
Thank You! We owe you greatly for your help in our Revolution for Independence!
And to our ancestors who gave so much,
we remember you, and thank you every day. 

Happy Independence Day ~ the 4th of July

Comments are closed,  thanks for stopping by. 

See Y'all Soon~

~ Potting Bench ~ Garden Shed ~ Create & Recycle

Senin, 01 Juli 2013

A little revisit to the potting bench area:

I love updates to see how things are progressing in the garden. In this case, the lovely potting area has gone to pot! All puns intended. With the heat of summer, I haven't been out starting too many young plants and Sweet Hubby seems to have found the perfect place to kind of dump all the gardening stuff. Temporarily of course. So I'm looking at these pretty pictures just to enjoy and remind me I have another area of life to get organized! Absolutely NO updated pictures from this table until maybe.... who knows when! But that little succulent dish garden really stood the test of time.
.......................................................

Outdoor furniture! That's what wood shelves and other building elements are when they become a space to pot your plants and other gardening activities. Whatever you would like to call it, a potting
CONTINUE READING

~ Bon Appetit! Brownies - French Farmhouse Kitchen & White Kitchens

Jumat, 28 Juni 2013


When I first saw the cover of the latest Bon Appetit magazine, all I wanted was a brownie! As much as I love chocolate chip cookies, brownies sometimes are even higher on the food chain of desire.


As usual this recipe had a bit too much saturated fat for the way I like to cook and eat. I want to enjoy my food without worrying about clogging my arteries. No I didn't think about that sort of thing when I was twenty.

I'm busy working on the kitchen. Not the biggest makeover I've ever done, but lots of things on the to do list nonetheless. As usual one thing keeps leading to another. Hope you enjoy this post with a wonderful and unique French Farmhouse Kitchen featured in Bon Appetit.


The the first kitchen posted here, which is in the same issue as that brownie, stole my heart. So I had to take a closer look. Is it the stove? The cabinets? The sink? How about this antique table? Um, maybe. The yellow isn't my color, but I love the floor and the wood cabinets with white.

The white kitchen above also appeared in Bon Appetit, last year. This time it is easy to know exactly why I love it. The white is fresh and clean looking with the dark stained chairs and floors.

And the same for the Christopher Peacock kitchen below. I don't think I could find a kitchen designed by that man that I would not love.


The most interesting thing to me about the French inspired kitchen in the first picture, is that I'm not in love with all of the individual things in the kitchen, and yet..... I love the space. I feel very at home looking at this space. The sum of the parts in this kitchen, designed by my favorite kitchen designer, Mick de Giulio, is much greater than the parts, for me anyway. I guess I just need to study this one for a little while, as I munch on some brownies of course. It just might be the antique island that calls out to me the most.

....................................

When I first wrote this post I was experimenting with different recipes of gluten-free brownies. There are lots of good recipes that you can find on line. It turned out to be a fairly easy one to come up with. The chocolate hides any unusual taste from the gluten free flours. My favorite is to use ground almonds with a small amount of brown rice flour. Yum!


See Y'All Soon~

  ................................................................................
Click on the pictures below to visit The Decorated House Shop!


~ How to Create a Succulent Dish Garden ~ Tutorial

Senin, 17 Juni 2013

Making a succulent dish garden is one of the easiest garden projects you will ever do. And it is so rewarding for instant gratification, and months or years of enjoyment. The one above is a few months old. It sits in a semi-shade spot and I water it occasionally if it hasn't rained in a while.


1. Select a container at least 4 inches deep.
This terracotta dish is only about $5, and is really perfect for succulents. You want a shallow dish but one that is at least 4 inches deep. You can find these at Home Depot, Lowe's and garden -  nursery centers.


2. Purchase various succulents in small pots.
(Of course you could use cuttings, but this takes longer and more patience.) These vary in price from the smaller peat pots starting at about $2 and then up for the size and type of plant.

3. Cover the bottom with gravel
4.  Then add cactus potting soil.
5. Moisten the soil before adding the plants.

6. Plant each succulent to the same depth it was in its pot.
......
Do not water again until the soil is dry.

Because we have so many days above 90* in the summer,
I do give my succulents a sprinkle about once a week.


Just as with any gardening, look for colors and textures
so you will have a more beautiful combination.


A wonderful bonus is that some succulents have very pretty and vibrant flowers.
Not usually very large, but pretty none the less.


There is no need to water again when starting your dish garden if you began with moist soil. The garden can go without water much more easily than adapting to too much water or rain.


The cuttings should be allowed to sit and dry a bit before starting them in soil. Then they like a constant lightly moisten soil to root before they will be like the grown plants which need much less water.


The stonecrop succulent in the hanging basket is an example of a really pretty succulent that can take a bit more water and be use with other plants that require more water. It is the pretty spiky plant spilling over the edge.

If you go through a very rainy period, then move the dish gardens where they are able to stay dry or do as we do, cover them with a tarp.  In the winter, they do need to be brought inside or sheltered when the temps go below 45* or so. In warmer climates like ours, they can stay outside all year long.
...................................

Growing succulents indoors can be a bit trickier.
* They need a lot of light and they also like a hot and dry environment.
Be sure to turn them so that the entire plant receives the same amount of light.
* A terracotta container works great since it breathes and can let the soil dry easier.
* They need special cactus soil. They don't do well in plain sand. I have cheated and mixed
some regular potting soil with nutrients with my cacti soil, and it has been fine though.
* Water thoroughly with lukewarm water, and then let them dry between water waterings.
* When you take them back outside, don't put them in full sun right away. They can get sunburn

Lots of good info for growing them inside and outside here at Desert Gardens.


For some stunning pictures and ideas
for growing succulents visit my
friends at Atelier de Campagne
and this post showing some beauties.
........................

See Y'All Soon~

  ................................................................................
Click on the pictures below to visit The Decorated House Shop!